Any resemblance to any other tutorial or signature is merely coincidental and is not intended.
I am using the beautiful artwork of PinupToons (Rion Vernon). You can purchase his artwork and a license to use it HERE at CDO
I am using Kaligraf Latin font
I am using a wonderful PTU kit from oOohLaLa Scraps called Black & White. You can purchase this kit HERE at I Got Lucky Skraps
Pieces from the kit used in this tutorial are
flower5
doodle1
bling1
frame1
paper14
You must have working knowledge of PSP to complete this tutorial. This tutorial was written using PSPXI
Open a new 600x600 psp image and flood fill white
Open paper14 and resize to 600x600
Open frame1 and resize to 600x600. Delete/Erase any part of the paper not viewed inside the frame
Open your tube. Duplicate your tube layer.
Working with Duplicate tube Layer go to Image/Resize/150%. Place Duplicate tube Layer behind frame1 Layer. Delete/Erase any part of the tube not viewed inside the frame. Go to Effects/PhotoEffects/Black and White film. Layers/Properties/Opacity50
Make background Layer, frame1 Layer, and original tube Layer invisible. Go to Layers/Merge/Merge Visible. Make all Layers visible again.
Open bling1. Resize to your liking. Duplicate bling1 Layer. Place both bling1 Layers behind paper14 Layer. Add a drop shadow of 1 to both bling Layers
Open doodle1. Add a drop shadow of 2 to this Layer Resize to your liking. Place behind tube Layer
Open flower5. Resize to your liking. Add a drop shadow of 3 to this Layer. Place above frame1 Layer.
Add a drop shadow of 3 to frame1 Layer
Add a drop shadow of 4 to your tube Layer.
Resize the signature if needed
Add your text
Remember to add your copyright information before saving
Showing posts with label pinuptoons siganture tutorial. Show all posts
Thursday, April 21, 2011
Monday, April 11, 2011
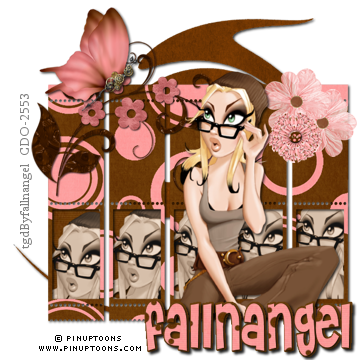
Surprise Butterfly
Any resemblance to any other tutorial or signature is merely coincidental and is not intended
I am using the beautiful artwork of Rion Vernon (PinUp Toons). You can purchase his artwork and a license to use it HERE at CDO
The font I used in Cheri
The kit I used is a PTU kit from BabyCakes Scraps called Lottie Dottie, it can be purchased HERE at Lollipops 'N Gumdrops
Pieces from the kit used in this tutorial are
frame_two
swirl_three
Butterfly
floral_doodle
paper_flower
ruffled_flower
paper_twelve
paper_thirteen
You must have a working knowledge of PSP to use this tutorial. This tutorial was written using PSPXI.
Open a new 600x600 image and flood fill white.
Open frame_two and resize to your liking
Open your tube. Duplicate your tube Layer 5 times. Make your original tube Layer invisible (you can make a Layer invisible by clicking on the eye of the layer in the layers pallet) Move frame_two Layer above tube Layers 1-5. Arrange the tube Layers in the openings of the frame. Erase any parts of the tubes not in the frame opening. Merge tube Layers 1-5 together. Place a drop shadow of 2 on the merged tube layer. Go to Effects/Photo Effects/Sepia Toning.
Open paper_thirteen. Place paper_thirteen Layer behind merged tube Layer. Erase all parts of paper_13 not in the frame openings.
Select frame_two Layer. Add a drop shadow of 2. Merge frame_two Layer, merged tube Layer, and paper_thirteen Layer together.
Make your original tube Layer visible. (click on the eye again to remove the "x" and make the layer visible) Add a drop shadow of 3 to your tube Layer.
Open swirl_three. Place behind merged frame_two layer.
Open floral_doodle and resize to your liking. Add a drop shadow of 2 to the layer.
Open Butterfly and resize to your liking. Add a drop shadow of 2 to the layer. Place Butterfly Layer in the line of site of your tube
Open paper_flower and resize to your liking. Duplicate this layer. Arrange to your liking
Open ruffled_flower and resize to your liking.
For the text
Open paper_twelve in as a new image.
Switch back to your tag. In your materials pallet in the top color square click on the circle on the far right so you are only using the bottom color square. On the bottom color square click on the circle on the far left and go down to pattern, select patter. Click on the center of the bottom color square to pick a different pattern. From the available patterns choose paper_twelve.
Write your text
Go to Layers/Convert to Raster Layer
Using your magic wand click on any of the blank space surrounding your text. Go to Selections/Invert. Selections/Modify/ Expand 3. Add a new layer. Flood fill the inside of the selected area brown on the new Layer. Go to Selections/Select None. Move your New Layer to behind your text Layer. Add a drop shadow of 2 to both Layers.
Resize the tag to your liking.
Add your copyright information before saving
I am using the beautiful artwork of Rion Vernon (PinUp Toons). You can purchase his artwork and a license to use it HERE at CDO
The font I used in Cheri
The kit I used is a PTU kit from BabyCakes Scraps called Lottie Dottie, it can be purchased HERE at Lollipops 'N Gumdrops
Pieces from the kit used in this tutorial are
frame_two
swirl_three
Butterfly
floral_doodle
paper_flower
ruffled_flower
paper_twelve
paper_thirteen
You must have a working knowledge of PSP to use this tutorial. This tutorial was written using PSPXI.
Open a new 600x600 image and flood fill white.
Open frame_two and resize to your liking
Open your tube. Duplicate your tube Layer 5 times. Make your original tube Layer invisible (you can make a Layer invisible by clicking on the eye of the layer in the layers pallet) Move frame_two Layer above tube Layers 1-5. Arrange the tube Layers in the openings of the frame. Erase any parts of the tubes not in the frame opening. Merge tube Layers 1-5 together. Place a drop shadow of 2 on the merged tube layer. Go to Effects/Photo Effects/Sepia Toning.
Open paper_thirteen. Place paper_thirteen Layer behind merged tube Layer. Erase all parts of paper_13 not in the frame openings.
Select frame_two Layer. Add a drop shadow of 2. Merge frame_two Layer, merged tube Layer, and paper_thirteen Layer together.
Make your original tube Layer visible. (click on the eye again to remove the "x" and make the layer visible) Add a drop shadow of 3 to your tube Layer.
Open swirl_three. Place behind merged frame_two layer.
Open floral_doodle and resize to your liking. Add a drop shadow of 2 to the layer.
Open Butterfly and resize to your liking. Add a drop shadow of 2 to the layer. Place Butterfly Layer in the line of site of your tube
Open paper_flower and resize to your liking. Duplicate this layer. Arrange to your liking
Open ruffled_flower and resize to your liking.
For the text
Open paper_twelve in as a new image.
Switch back to your tag. In your materials pallet in the top color square click on the circle on the far right so you are only using the bottom color square. On the bottom color square click on the circle on the far left and go down to pattern, select patter. Click on the center of the bottom color square to pick a different pattern. From the available patterns choose paper_twelve.
Write your text
Go to Layers/Convert to Raster Layer
Using your magic wand click on any of the blank space surrounding your text. Go to Selections/Invert. Selections/Modify/ Expand 3. Add a new layer. Flood fill the inside of the selected area brown on the new Layer. Go to Selections/Select None. Move your New Layer to behind your text Layer. Add a drop shadow of 2 to both Layers.
Resize the tag to your liking.
Add your copyright information before saving
Thursday, April 7, 2011
Black Hearts
Any resemblance to any other signature or tutorial is merely coincidental and is not intended.
I am using the beautiful artwork of Rion Vernon (Pinup Toons). This tube was purchased while he was with CILM, you can now purchase his artwork HERE at CDO
I am using Wee ScotsLass Mask 4 which you can download from her blog HERE
I am using Kingthings Spike font
I am using a PTU kit from DigiMania Scraps called Misfit Negative which can be purchased HERE at I Got Lucky Skraps
Pieces from the kit I used are
Black Heart
Bow and Glitter Heart
Brad
Butterfly
Feather 1
Glitter Heart Frame
Paper 4
Paper 5
You must have a working knowledge of PSP in order to use this tutorial. This tutorial was written using PSPXI
Open a new 600x600 image and flood fill white.
Open Paper 5 and resize to 600x600. Go to Layers/LoadSave Mask and apply your mask. Layers/Merge/Merge Group to merge your mask group together
Open Paper 4 and resize to 600x600
Open Glitter Heart Frame and resize to your liking. Using your magic wand tool select the inside of Glitter Heart Frame. Go to Selections/Modify/Expand 4. Selections/Invert. Using the layers pallet select Paper 4 Layer. Press your delete button. Selections/Select None. Add a drop shadow of 2 to Glitter Heart Frame Layer. Merge Glitter Heart Frame Layer and Paper 4 Layer together.
Open Feather 1 and resize to your liking. Place behind merged Glitter Heart Frame Layer add a drop shadow of 2 to Feather 1 Layer
Open Brad and resize to your liking. Place infront of merged Glitter Heart Frame Layer. Add a drop shadow of 2 on Brad Layer.
Open Butterfly, Bow and Glitter Heart, and Black Heart. Resize all Layers to your liking and add drop shadows of 2 to all Layers
Open your tube and resize to your liking. Place a drop shadow of 3 on your tube.
Add your text and a drop shadow of 1 to your text.
Resize the completed tag to your liking
Add your copyright information before saving
Sunday, April 3, 2011
Gothic Rebel
Any resemblance to any other signature or tutorial is merely coincidental and is not intended.
I am using the beautiful artwork of Rion Vernon (Pinup Toons) You can purchase his artwork and a license to use it at CDO HERE
The font I used is Girls are Weird
The kit I used is a PTU kit from Kristin at Toxic Desirez called Rebel Rider 3 and can be purchased at Scraps With Attitude HERE
Pieces of the kit used in this tutorial are
Doodle
Charm & Chain
Bottlecap
Winged Skull
Frame 1
BGAO Sticker
BGAO Wired Heart
Paper 25
You must have a working knowledge of PSP to use this tutorial. This tutorial was written using PSPXI
Open a new 600x600 image and flood fill white
Open Paper 25 and resize to your liking
Open Frame 1 and resize by 80% repeat italicized two times.
Open your tube and place in front of Frame 1 Layer
Open Charm and Chain and place in front of Frame 1 Layer
Using your layers pallet select Frame 1 Layer. Go to Selections/Select All, Selections/Float, Selections/Defloat. Choose your erase tool. Select Charm and Chain Layer. Erase part of the chain so it appears connected to your frame. Select tube Layer and erase any of your tube that appears outside of your frame. Go to Selections/Invert. Select Paper 25 Layer. Press your delete key. Go to Selections/Select None.
Open Doodle and Bottlecap placing them behind Paper 25 Layer.
Open Winged Skull. Place infront of Frame 1 Layer. Resize to your liking. Rotate 35 degrees left.
Open BGAO Sticker and BGAO Wired Heart placing them in front of your tube Layer.
Using your layers pallet select Doodle Layer. Go to Selections/Select All, Selections/Float, Selections/Defloat. Choose your erase tool. Using the layers pallet select BGAO Sticker and erase part of the BGAO Sticker inside the selected area. Go to Selections/Select None.
Add a drop shadow of 3 to all elements and your tube
Add your text
Resize the signature to your liking
Add your copyright information before saving
Saturday, March 19, 2011
A PinupToons Easter
I am using the wonderful artwork of Rion Vernon. You can purchase his artwork and a license to use it HERE
The Mask I am using is Vix Mask 453 You can download it HERE
The font I used is Vtc-NueTattooScript
I am using Wicked Princess's Oh Happy Day scrap kit. You can download it from her blog HERE, please remember to leave her some love if you do!
Pieces from this kit that I used are
PP17
Eggcarrotstring
Eastertree
Basketoeggs
offsetcircleframe
flowerbutton
You must have a working knowledge of PSP for this tutorial. This and all of my tutorials are wrote using PSPXI
Open a new 500x500 image. Flood fill white.
Open the paper of your choice. Apply the mask of your choice to the paper. Merge the mask group together.
Open the frame, and resize to your liking. Open your tube of choice and go to layers/duplicate to duplicate your tube. You want to hide one of the tube layers so you are only working with one of them. (You can hide a layer by clicking on the eye next to the image on your layer pallet.)
Working with your tube layer that is visible, move it to behind your frame. Resize this layer so the face of your tube fills your frame. Select the frame layer. Using your magic wand select the inside of the frame. Selections/modify/expand 4. Add a new layer. Flood fill the inside of the selected area pink. Unselect the selected area. Duplicate your pink circle layer and flood fill the circle white on your duplicate layer. Move the white layer to behind your tube layer and pink layer to above your tube layer. Select your pink circle layer. Go to Effects/Texture Effects/Textures/Grass. The go to Layers/Properties/Opacity 25. Select your tube layer, place a drop shadow of 2 on your tube, then Effects/Photoeffects/Black and White Film. Select your frame layer and place a drop shadow of 3 on the frame. Hide your base layer so all you have visible is your frame and the layers that you just added. Go to Layers/Merge/Merge visible. Unhide your base layer.
Unhide your original tube layer. Resize to your liking, and place off center to the right.
Open the EggCarrotstring element and resize so it drapes across your frame.
Open the Eastertree element and resize to your liking, placing it behind your tube layer
Open the Basketoeggs element and resize to your liking. Place it infront of your tube layer
Open the flowerbutton element and resize to your liking. Place it between the frame layer and the EggCarrotstring layer.
Place a drop shadow of 2 on all elements added and your tube
Place the text on your signature using the color of your liking. Next you want to go to layers/convert to raster layer. Then selections/select all, selections/float, selections/defloat, selections/modify/expand 4. Add a new layer. Flood fill inside the selected area white on the new layer. Add a drop shadow of 2 to the white text layer. Move your original text layer to above your white text layer and add a drop shadow of 1 to your text on this layer.
Resize all layers of the signature to your liking and add your copyright information.
Any resemblance to any other signature or tutorial is merely coincidental and is not intended.
Subscribe to:
Posts (Atom)


