

Any resemblance to any other tutorial or signature is merely coincidental and is not intended
I am using the beautiful artwork of Myka Jelina. You can purchase her artwork and a license to use it HERE at her store
The font I am using isDeutsche Zierschrift
The kit I am using is a PTU kit call "All of my Favorite Things" by FallnDesignz, which you can purchase HERE at Taggers Dreamz
Pieces of the kit used in this tutorial are
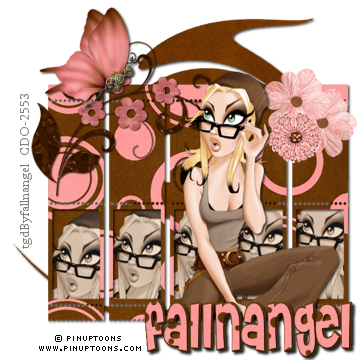
paper 12
rosepetals 2
frame 4
doodle 3
doodle 2
cloud 2
webwithspider
You must have working knowledge of PSP to complete this tutorial. This tutorial was written using PSPXI
Open a new 600x600 image in PSP and flood fill white.
Open paper 12
The tube that I am using comes with 2 sizes. Open both sizes. (If your tube only has one size then duplicate your tube Layer and resize the duplicate copy larger)
Open frame4. Resize to your liking. Place your larger tube Layer behind frame4 Layer. Using your magic wand select the inside of frame4. Go to Selections/Modify/Expand 2. Selections/Invert. Select your larger tube Layer, press delete. Select paper12 Layer, press delete. Selections/Select None.
Add a drop shadow of 3 in black to frame4 Layer.
Add a drop shadow of 2 in white to larger tube Layer.
Merge frame4 Layer, larger tube Layer, and paper12 Layer together.
Open cloud 2 and resize to your liking. Duplicate cloud2 Layer. With Duplicate cloud2 Layer selected go to Image/Flip. Arange cloud2 Layer and duplicate cloud2 Layer to your liking on top of your merged Layer.
Open doodle2. Place behind merged Layer. Add a drop shadow of 2 in black to doodle2 Layer
Open rosepetals2. Place behind doodle2 Layer. Add a drop shadow of 1 in black to rosepetals2 Layer.
Open doodle3. Resize to your liking.
Open webwithspider. Resize to same size as doodle3. Merge together webwithspider and doodle3 Layers. Erase part of doodle3 that covers your frame. Add a drop shadow of 3 in black to this merged Layer.
Add a drop shadow of 3 to your tube Layer
Resize if needed
Add your text. Add a drop shadow of 4 in black to your text
Add your copyright information before saving.


